tn (3).jpg

850T 850t restoration

Introduction

thought id start my own thread on my van restoration, lots to do and only a few hours in the evening to do work on the van so might take a while to finish...
tn (3).jpg

tn (2).jpg

tn.jpg

850t 017.JPG

850t 014.JPG

these were taken about two weeks ago when i first got her home.
  • Like
Reactions: diluppo
Hello mate. The van's looking great, you're doing a brilliant job.
I was wondering where you got the lower front panel from (under the door) as I need to do both sides on mine. Hope you dont mind me asking. Cheers.
Keep up the good work, can't wait to see it finished.

I have got all my panels from italian ebay, the price can vary so dont buy the first one you see, think i paid about £55 each side which is not to bad if you take into account the postage. Is there any other panels you need?
 
Well after seeing the other 850T that has been dicovered i thought i would do a little update.
The last panel is on and all the welding is finally finished! all the inner wheel arches are treated and undersealed, and i am currently working on doing the same to the rest of the underside soon....


850t front arch 009.JPG

850t front arch 008.JPG

850t front arch 011.JPG

850t front arch 015.JPG

850t front arch 020.JPG

850t front arch 012.JPG

For some strange reason the arch was shorter than the original, so i had to cut it twice and weld it on like this.

850t front arch 018.JPG

850t front arch 024.JPG

850t front arch 021.JPG

850t front arch 027.JPG

850t front arch 028.JPG

I am finaly getting the hang of plug welding now...

850t front arch 025.JPG

850t front arch 034.JPG

850t front arch 031.JPG

850t front arch 036.JPG

This is now the bodywork finished now, just waiting for the weather to warm up so i can crack on with the small task of filling and priming ready for paint!

850t front arch 038.JPG

Here is some of the rusty metal that i have removed from the van :eek:, there was more but it was binned when i had a good tidy of the garage.
 

Attachments

  • rust 023.JPG
    rust 023.JPG
    1.8 MB · Views: 53
  • rust 022.JPG
    rust 022.JPG
    1.9 MB · Views: 57
  • rust 019.JPG
    rust 019.JPG
    2.2 MB · Views: 58
Great stuff, inspired me to get cracking on restoring mine again (a '74 model). I saw your van up for sale too a while back on eBay, so glad it's gone to a good home, the repairs are really impressive, particularly those fiddly roof one's. Keep up the good work & keep the pics coming! Cheers, Andy
 
Been hard at it with the prepping of the bodywork, lots of fine filling done and the van is almost ready for paint!
i am hopeing to have the paintwork finished in 2 weeks, as i have a week of work. the paint has been ordered just waiting for the weather to warm up a little bit then i will crack on.

fiat paint 013.JPG

fiat paint 018.JPG

fiat paint 019.JPG

fiat paint 020.JPG

fiat paint 021.JPG

fiat paint 024.JPG

fiat paint 025.JPG

fiat paint 027.JPG

fiat paint 028.JPG

fiat paint 029.JPG

fiat paint 032.JPG

fiat paint 034.JPG

fiat paint 036.JPG

fiat paint 037.JPG

fiat paint 040.JPG

an prep 003.JPG

an prep 005.JPG

an prep 006.JPG

an prep 004.JPG

an prep 007.JPG

an prep 010.JPG

an prep 011.JPG

an prep 012.JPG

an prep 014.JPG

an prep 016.JPG

an prep 018.JPG

Sorry for the number of photo's.
 
Well have some good news the van is finally sprayed!!!
grin.png

But before I could give the van its final prep and primer ( with the doors on ) I had decided to change the rear arches! was not happy with doing this but the capri arches were just to narrow and seriously limited my options for wheels in the future. I opted to use group 2 mini arches as they seemed a good fit and didnt cost too much.
Oh and I had a little bit of a problem half way through the spray job, I twisted my knee and had to do the last coat of paint with the aid of a knee brace and a crutch... not very easy but had no choice as I did not fancy flatting off the paint and re-doing the last couple of coats!


These are the new arches, not 100% sure on them atm, but they are growing on me.


Doors primed ready for fitting.


Doors fitted and 3rd and last coat of primer.


And here is my temporary boot support lol


And here is the colour that I chose in the end...


Well there you go its certainly bright! I almost did the two tone brown and beige even bought the paint, but in the end I wanted something loud! and thats what I think I have ended up with lol.
Like I said the last coat was put on while I was in quite alot of pain, but I NEEDED to be finished and (although I need to see it in the daylight ) I am more than happy with the colour and the spray job.
 
Re: 850t restoration, Painted AGAIN!

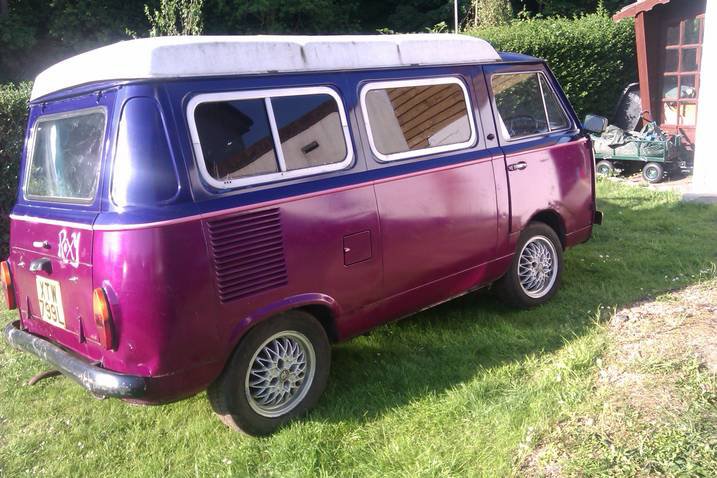
Hello little bit of an update on the van, I decided after seeing the van out in the sun that I was not happy with the finish of the paint, so spent one of the hottest days of the year flatting back and prepping again ready for another crack at getting a better finish. (y)

paint mk2 003.JPG

paint mk2 011.JPG

paint mk2 013.JPG

paint mk2 016.JPG

paint mk2 018.JPG

The last one shows that I managed to get a lot better finish the second time round, its not perfect but for a job done in a small dusty garage with a compressor that's older than me it will do! got my friend coming to polish it up over the weekend so that will hopefully be the last of the paint work.
I have also painted the engine bay black and started fitting little bits back on, which I am really enjoying after all the welding and messy jobs.

FIAT REFIT 019.JPG
Electric fuel pump with the coil + braided hoses and battery box from a ford puma! it is starting to look nice and tidy.
FIAT REFIT 010.JPG
Been dreading this job! had to get a universal seal and struggle like hell to fit the window.
FIAT REFIT 012.JPG
Took me and my friend 2 hours of head scratching and tea drinking but we got there in the end.
FIAT REFIT 017.JPG
New chrome filling strip for the back window.
FIAT REFIT 022.JPG
And 'Roxy' now has her face back on!!!

Door locks, dash instrument panel, door trim all back on, and I have got rid of that limo black window tint.

FIAT REFIT 015.JPG

FIAT REFIT 016.JPG

FIAT REFIT 014.JPG

So over the next week I will carry on refitting all the boxes of bits that I have, the engine should hopefully be in in a couple of weeks time :D.
 
Wow, you have put some work into this, and doesn't it look great! looks like John Deere green! Makes me want to get mine underway, but I dread to think what its like under its crappy drab blue paintwork!! Can't wait to see the update!
 
Thank you every one for your kind words.
A bit more progress with the van, I have had the van polished and after the day spent with the mop I am finally happy with the paint! Also the engine is now in too! and I have also been busy refitting the wiring loom. there are a few issues to sort out with lights ect but I am finding that most are down to bad earths.
Anyway here are some more photos.

van engine 005.JPG

van engine 008.JPG

van engine 006.JPG

van engine 009.JPG

van engine 007.JPG

Like I said I am really happy now with the shine the van has now.

van engine 010.JPG

Painting the rear panel and boot.

van engine 014.JPG

van engine 017.JPG

van engine 019.JPG

My wife getting her hands dirty!

van engine 020.JPG

van engine 023.JPG

van engine 024.JPG

van engine 025.JPG

Here is the front headliner back in.

van engine 018.JPG

Thank you for looking.
 
Excellent work, looks like you have a deep shine on that paintwork - you can be proud of that! unbelievable to think what it looks like at the beginning of the thread. Really wanting to get playing with my van now!

That engine is so diddy! have you fired it up again yet?

good on your wife, I need to get mine more involved!!

keep us posted...

Just read your post then went to the first page of this thread, and yes it is hard to believe how much work has gone into this van!
Lol yep tiny engine that at the moment is suffering from a broken coil so as soon as it arrives fingers crossed it will fire into life again...
I have also just bought a twin choke 30dic weber carb and manifold, but I am not going to fit it to the van yet, I want to drive the van with the standard carb first it see if there is any difference in performance.
 
have you ever driven on the road? I imagine performance is pretty dire !!

what are you going for wheel wise? sticking with the vx cross spokes?
 
Not a lot of progress I am afraid, have spent the last week trying everything to get the engine running (which it was before it came out) but with no luck. I have spark, fuel, good compression and the timing is how it should be.
I have also replaced the points, condenser, rotor, dizzy cap, coil and it has new HT leads :confused:.
But I am not too worried because I have a sneaky feeling that it is the carb... so this was delivery yesterday :devil:.

newhaven 022.JPG

newhaven 023.JPG

newhaven 025.JPG

Its a twin choke weber 30dic, which was fitted to the 850 spider, and from the prices that they go for must be quite rare! just got to wait for an intake manifold gasket to turn up and I will have another go at starting the engine.
 
Finally the engine is running! After fitting the new carb and checking EVERYTHING she sputtered into life. need to tune it to get it running smooth, but 10:45 at night is not the time for that ( its very load with the exhaust I have fitted ) so tomorrow I will be able to drive the van out the garage for the first time in about 8 months... can not wait!!! :D
 
Excellent. Sounds good. What exhaust is that made up from?
 
Back
Top