

You are using an out of date browser. It may not display this or other websites correctly.
You should upgrade or use an alternative browser.
You should upgrade or use an alternative browser.
-
 363799030_6234705633307799_6883081153086689714_n.jpg113.1 KB · Views: 58
 -
 363812259_6234705993307763_8226407192442742826_n.jpg143.7 KB · Views: 58
 -
 364122461_6234706166641079_6167352930909629643_n.jpg159.5 KB · Views: 61
 -
 364153578_6234706109974418_740042572957209535_n.jpg158.6 KB · Views: 58
 -
 364188763_296542582926197_260914466609130050_n.jpg961.9 KB · Views: 54
 -
 364197081_6234705869974442_2840234503345060162_n.jpg120.6 KB · Views: 53
 -
 364240507_6234705886641107_1393364762721022267_n.jpg132.2 KB · Views: 58
 -
 366794336_651767813347236_8927999325411978017_n.jpg101.6 KB · Views: 61
 -
 366799632_1003572930757717_2225879961067835585_n.jpg121.6 KB · Views: 55
 -
 379622490_300797559246883_4731889514442955893_n.jpg1.3 MB · Views: 68
 -
 379631306_648514280759326_136987028669445266_n.jpg107.9 KB · Views: 55
Punto (Mk1) Project R the Mk1 Cabrio Restoration project
- Added by AndyRKett
- Create date
- Updated
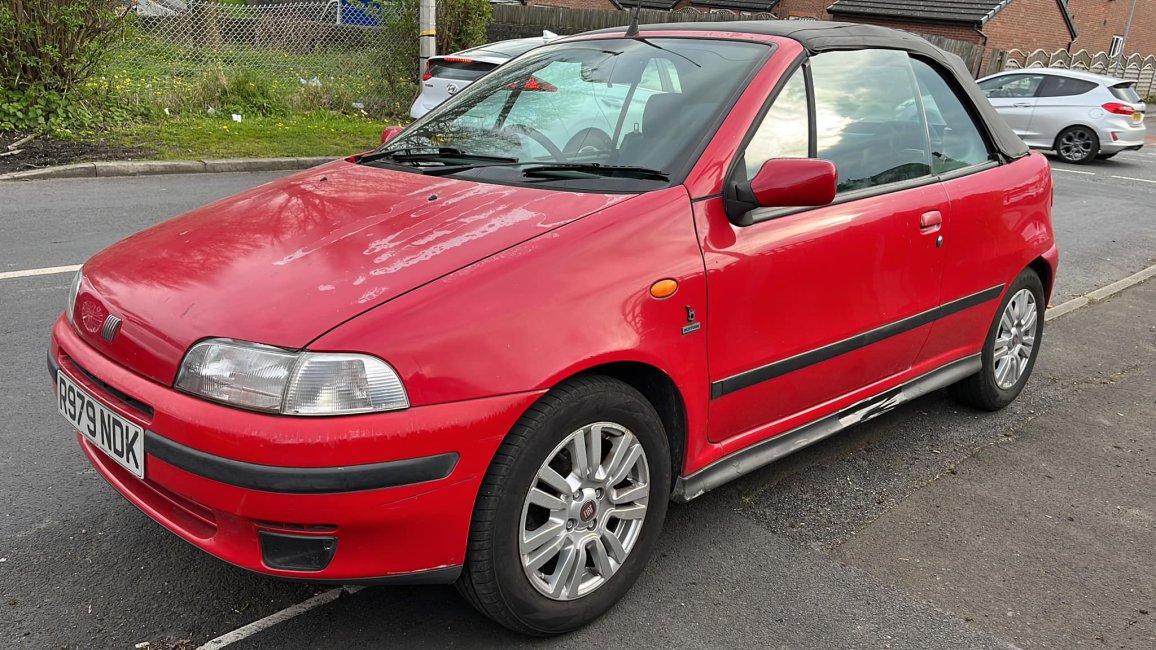
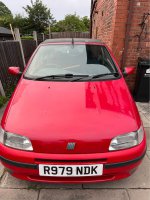
1998 Rosso Red Mk1 Punto ELX Cabrio, that has been very neglected.
So what started out as a wheel refurb as you'll see in my last post, turned into something rather more involved.
With the wheels off everything behind the wheel looked really grotty and rusty. The main concern was the subframe given italians tendency to build them out of rust which just crumbles in our UK weather, I was also concerned about the state of what was behind the wheel arch liners and if the fronts of the sills where rusty.
So without any real plan I started stripping everything down. Off came the lower arms. Steering joints. the drive shafts. struts and wheel arch liners. It wasn't long before there was nothing left in the wheel arch but a brake caliper hanging on its pipe. (that eventually came off too)
Soon the car was dangling in the air without any of its important bits that connect it with the ground.
The subframe was not just in a surprisingly good condition, aside from some very mild surface rust, it was basically completely untouched.
A quick clean up with a wire brush to clean up any loose dirt and rust, and then a damn good blast with the pressure washer and it was as good as new.
I layed down a coat of Etch Primer, then some gloss black to make it actually look as good as new.


These three pictures show the subframe before paint.

This picture shows the subframe before removal from the car and you can only see any real rust behind where the exhaust bracket mounter. this was just from the bracket and the metal under the rust was basically unmarked and still painted.
What then followed was a lot of sanding, wire brushing and cleaning. over the course of the last 3 or so weeks in the evenings. Then the application of a lot of paint. Some colour coding of parts to make it a little more visually appealing rather than just painting everything black. So anything springy (springs and roll bar) got painted red. Anything structural got painted black, and anything else was either painted silver or nickel plated to add contrast. The steering joints for example were painted silver as everything attached to them was painted black. Finally because the brakes would be visible through the wheels and the car being red I panted the calipers a nice bright Yellow.

The drive shafts have also been fully refurbished and painted. new grease and checked for wear.
Everything was properly prepped and painted with high quality paints.
I have installed all new parts where needed or essential for safety. So new brake discs and pads. New shocks, new antiroll bar bushings. New ball joint covers, new clips and bolts where needed. New boots and gaiters where needed.
I am super happy with how it has all turned out. Everything looks shiny and new and is better than when it left the factory. I am just waiting on a set of bump stops for the shocks (the old ones had ceased to exist) and then I can start bolting everything back on the car. The one thing that has really surprised me is the insane amount of weight in all these components for such a little car, I would estimate probably more than 75 KG in everything bolted to the subframe. I think I may have to find a way to weight it to see for sure, and that is without wheels.
Anyhow I hope you can enjoy all the shiny bits before they get bolted back on never to be seen again. I would like to thank @ben for not only allowing me to host the pictures from the build here but for also providing a really good set of tools to format all these pictures and text to lay it out so its easy to read and navigate having been here >10 years I can appreciate just how much the forum has changed and improved over the years,


Rebuild process here
I have also been working on some other little jobs along side the engine.
I have obtained a second steering wheel with airbag which I plan to retrim with Leather, a nice little project to undertake soon.

I have also been working on the allow wheels in the background. This is the first of 4 to be done. It was a total mess of corrosion to begin with so really happy at how well it has turned out. It still needs a couple of coats of lacquer but looking forward to getting all 4 to this state so they can finally go on the car and I can get rid of the horrible modern Punto wheels currently on the car.
The front of the wheel is Steel silver and the back is black with a blend between the two behind the spokes to give them some contrast, once the suspension is sorted the calipers and everything behind the wheels will be painted so the black will help make that pop a bit more.


The last couple of weeks the rebuild has stalled due to going on holiday, and stupidly losing a clip that has to come from Italy.
So I have taken to doing a little light restoration work, this involved using stuff around the house to Nickel plate some of the more rusty and grubby parts
Brackets that support the air filter box
Misc metal brackets that hold the headlights in place
And I have been plating all the bolts and hardware to prevent corrosion when putting it all back together.


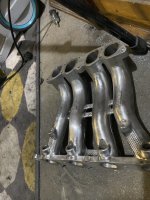
Its all a little bit out of order here, but here is the video to go with all the bits on the intake side that I had to fix
Started lapping the valves last night, only got one cylinder done but was getting a pretty good seal, put some water in the head and left over night, this
Morning a lot of the water was still there.
Was having problems with the stick not sticking to the valves, basically the valves are just too small so I’ve ordered something better which should arrive same day
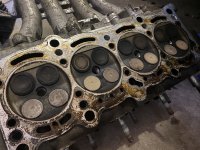
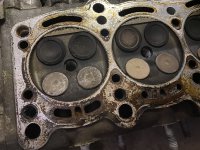
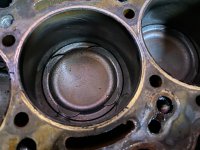
Cylinder head stripped down cleaned, combustion chambers given a light polish and the ports all given a going over to remove burrs moulding marks and anything else that will disrupt airflow.
The valves are all now clean and have been kept with all their own original parts, this engine has double valve springs which is impressive the collets have all been cleaned.
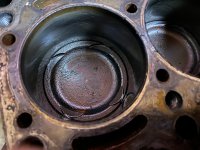
One of the discoveries is that the exhaust valves were so dirty and coked up even when fully open they would have had a considerable restriction in air flow.
They also had a about a mm of cack as were the intake valves the amount of carbon in the engine both in the combustion chamber and on top of the pistons would have massively decreased the displacement, airflow and increased the compression ratio this is probably why I was getting such high figures on the compression test
The air intake pipe work has also been cleaned up and will need a wash in the industrial parts washer (dishwasher) to get all the grit and grim out of the inside.


Attachments
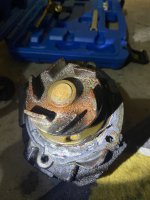
Finally got the head off the engine tonight, fairly straight forward and no blood was spilled, the head bolts turned into a two man job as someone had put the head bolts in with thread lock once the thread lock was broken they came out very easily, if I had to guess I would say it’s had a head gasket before.
I also found a leak between one of the water channels and the oil channel via the head gasket, it was only tiny but it’s reason enough to take the head off.
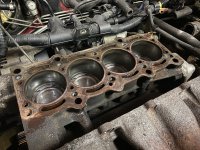
The one thing that had me worried is everything on the intake side was covered in a fine layer of grit, all on the inside of the inlet manifold and it turns out a lot of the dirt on top of the pistons was this mixture of oily grit,
That being said the sides of the bores are perfect and show virtually no signs of wear.
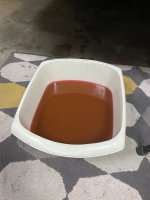
The water pump was grim and had kinda rust all over it, the coolant was murky brown, the oil was really dirty worse than what I drained out of the diesel Punto Evo with 176k on the clock. So I think it’s had a serious lack of servicing in recent years.
I am hoping that once back together this is going to be a good little engine, aside from needing a damn good clean everything moves smoothly and freely, the pistons are actually in good shape if you clean the crap off, so the next stage involves a lot of cleaning and a nylon brush
Attachments
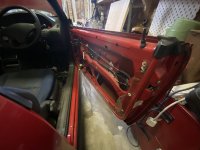
This last week I decided a nice quick job would be to sort out the very slow/week electric windows before the motors burn out. The car has one touch up and down but you have to keep pressing it as the motor frequently thinks the window has closed due to increased resistance.
So to get the window motor out you have to remove the door card and all the trims from inside, then you have to remove the weather seals from the top of the door which are clearly the original version that someone at Bertone has taken a Stanley knife to. The little front quarter lite glass it turns out holds the wing mirror on the car along with some others bits, there is a window runner that goes to the bottom of the door and it all has to come out to take the window motor out. I thought it would be wise to repaint the metal work of this piece while off the car, give it a coat of satin black but it turned out the can of black I had on the shelf and was maybe 15 years old, had gone bad and so I needed to wait for that to dry, sand it off and repaint it again, when putting it all back together one of the bolts sheered off, which I then had to drill out and retap.
Finally reassembling it all, and it seems a lot of bloody work for very little accomplished.
The frames/runners that support the glass all have adjustment screws to dial in the angle of the window to make sure it seals against the roof and door frame. So another couple of hours spent getting it all set up correctly.
Whoever designed this needs to be shot
Attachments
So with the car seeming down on power, I opted to start with the spark plugs, aside from being rather old and rusty, one of them was also broken which can’t help.
I’m begining to think there is not one specific reason for the low power and it’s likely to be a culmination of issues.
Weirdly I have wanted a Punto Cabriolet since about 2010, I remember seeing them selling very cheaply at the time on Gumtree and thinking it would be cool to have one.
If you've not noticed I have a bit of a thing for Convertible/cabrio cars, I don't know why I just love driving with the roof down in the summer and I love the complexity of a roof that disappears into the back. For me it always has to be a fabric roof with no roll over bar, and the Mk1 Punto was one of very few cars in the 90s when I was growing up that didn't have a hideous roll over hoop, such as the likes of the Escort or the Golf mk1 and mk3/3.5 cabrios.
Here is the story of how I came to get the car, many of you know I run my own youtube channel with quite a few subscribers now so this was not just a chance to relaunch/revamp the channel as it has sat unloved for about 2 - 3 years, but also a chance for me to get a car I had wanted for a long time.
I am also linking my new videos back to this thread on the forum so people can follow things and chip in with ideas and advice if they want.
So just to keep this as a history of the restoration process I need to add some updates here, so while I am delving back a bit in time this will just give me scope to look back and to make it easier for people to follow the updates without having to read through all the discussion.
I picked the car up from Stockport, drove it 240 miles home without incident. I had to stop and get wiper fluid, the car was seemingly lacking in power the whole journey initally struggling to get above 60mph but after about half an hour of driving it seemed to free up and could get up to motorway speeds. The top speed on the car should be a touch over 100mph so something isn't quite right. More investigation needed.
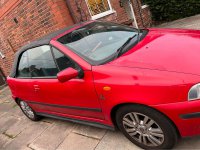
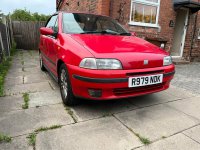
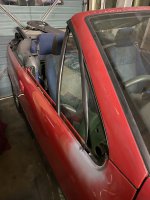
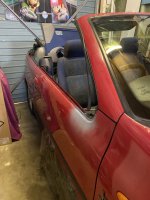
The general condition of the car is pretty poor. That said what attracted me to this car is the lack of rust. Or that is to say very little obvious rust for a mk1 punto. Some of them are swiss cheese these days after 25 years on the road despite the older puntos having pretty good rust protection.
The body work is free from any major dents, but the paint is terrible. The car will need repainting.
The wheels are wrong. Currently fitted to the car are some late model Punto wheels from around 2015/16, these are 4x100 fitment and the car does not have wobble bolts so they have to go. Fortunately I have already procured some original Punto GT wheels which came in a horrible black/grey colour so they need to be restored and painted silver to match the OEM wheels this car would have had as an option from new._89CF10B6.jpeg")
The tires on these wheels are date stamped 2008 so they have not been on the road for quite some time, the tires will be taken off to help make refurbishment easier.
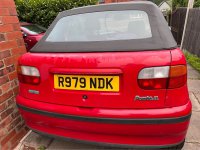
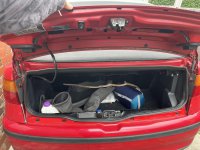
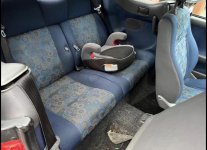
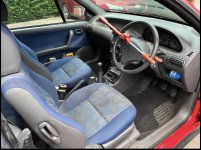
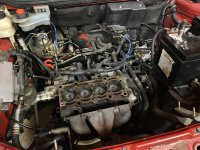
This is the 1.2 85hp 16 valve engine. It is the ELX model with all round electric windows and electric roof. it has a typically 90s/early 2000s stereo and the interior is pretty grotty. I have a plan to completely refurbish the interior including the carpet which appears to have been damaged behind the drivers seat in some sort of minor fire at some point. Which has also damaged the door card. No damage to the seat so these were either not in the car or have been replaced.
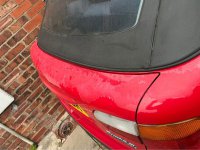
The Roof while not the original is still mainly waterproof but is in poor condition. Once all other work is done I think I will look at changing the roof.
So Engine, Body work, interior and roof, there isn't much of this car that doesn't need attention but so far at least the tin worm seems to have been resisted making it a good candidate for restoration.
Here is a little snap shot I found online for what I am aiming for.


